

PELVIC BREATHING
Steps:1
- Get into a supine position, with knees bent and feet flat on the floor or table. 2
- Bring attention to body and breath; notice contact points with the floor and your breathing pattern (“where is there movement with the breath”).
- Bring breath into lower trunk. Let most of the movement of the breath be below the ribcage (“Belly, low back and pelvis”).
- Bring attention to the area inside of the pelvis. The pelvis is shaped like a bony bowl with a hole in the bottom. Within this bony bowl is a muscular bowl going from front of pelvis (pubis) to tailbone like a hammock. When you have to go to the bathroom, you lift this hammock to “hold it”, and when you get to the toilet you release these pelvic floor muscles to evacuate bowel/bladder.
- See if you can feel a subtle movement with the breath in these pelvic floor muscles. 6
- Accentuate the movement of the pelvic floor with the breath. 7
- Inhale; relax pelvic floor down. 8
- Exhale; very gently draw pelvic floor toward the head. 9
- Bring the attention to the abdomen. Draw navel in on exhale. Relax belly on inhalation. 1
- Bring attention to the throat. Use glottis to slow down expiration. 1
- Continue, and notice any change in pelvic floor and deep abdominal muscles. Feel connection between glottis and expiratory muscles. Play with different ways of coordinating the pelvic, thoracic and cervical diaphragm.
- Inhale with abdominal and pelvic muscles engaged. Instead of completely relaxing deep abdominal and pelvic floor muscles on inhalation, maintain sufficient contraction to stabilize lumbar spine and pelvis.
- Do not allow upper chest to expand on inhale.
- Imagine compressing a ball of energy near navel. Pelvic floor and deep abdominals “fight” diaphragm. On inhale, diaphragm “wins”. On exhale, pelvic floor and abdominals “win”.314
edit Tips
- Be gentle and patient.
edit Warnings
- If you get dizzy or lightheaded, you are breathing too quickly.
- If you have asthma, this exercise in breathing is likely to trigger an attack.
Breathing Exercises – Diaphragmatic Breathing Exercises Boost Your Core
Breathing Exercises
Did you know that breathing exercises can promote pelvic floor strength and recovery?
How you breathe can impact upon your pelvic floor and effect your overall health and well being. Learning how to do diaphragmatic breathing exercises is simple and can be readily incorporated into your everyday life.
Read on now to learn:
What is diaphragmatic breathing?
Benefits of diaphragmatic breathing exercises for your health
How diaphragmatic breathing exercises can help your pelvic floor
Step by step diaphragmatic breathing exercise technique
What is Diaphragmatic Breathing?
Diaphragm breathing or abdominal breathing is a breathing exercise and technique that promotes deep breathing using your main breathing muscle- your diaphragm. The diaphragm is a dome–shaped muscle that sits under the lungs.
The image below shows how your diaphragm moves as you breathe. When you breathe in normally, your diaphragm contracts and moves downwards into your abdomen. This downward movement creates a vacuum inside your chest causing air to enter and fill up your lungs. You breathe out when your diaphragm relaxes and moves back up into your chest allowing air to leave your lungs.

Diaphragmatic movement
Benefits of Diaphragmatic Breathing
Diaphragmatic breathing is thought to benefit overall health in a number of ways:
Improve circulating oxygen levels
Reduce fatigue with exercise
Decrease blood pressure
Reduce stress and anxiety
Improve core deep abdominal and pelvic floor muscle function
Diaphragmatic Breathing and Core Muscles
The way you breathe affects the tone in your deep abdominal and pelvic floor muscles. Your trunk is like a cylinder surrounded by muscles that should work together during breathing. The muscles surrounding your trunk clinder include your diaphragm (top of the cylinder), your deep abdominal muscles wrapping around your trunk (the sides of the cylinder) and your pelvic floor muscles at the base of this cylinder.
During regular breathing your deep abdominal and pelvic floor muscles are also active to help maintain pressure in your trunk cylinder. When you breathe in deeply during diaphragmatic breathing, the pressure inside your abdomen is increased so that your pelvic floor muscles need to contract even more strongly to maintain your continence.
Learning diaphragmatic breathing technique and practicing breathing exercises can help you promote the coordinated activity of your deep abdominal and pelvic floor muscles. This is a vital first step in undertaking pelvic floor rehabilitation for prolapse or incontinence problems in women and men.
Posture, Breathing and Pelvic Floor Problems
You will notice that if you try to breathe deeply with slumped forwards posture, it is difficult to fill your lungs and breathe deeply. This is because when you are slumped your abdominal contents become compressed and your diaphragm can’t move downwards. This creates the need to use your upper chest muscles to help you breathe.
Slumped forward position and breathing with the upper chest muscles increase pressure on the pelvic floor; what’s more is that in this slumped forward position your deep abdominal and pelvic floor muscles can’t work well to counteract this increased pressure. This is why correct posture is very important in helping your diaphragm, pelvic floor and abdominal muscles to work well together.
If you live with a prolapse, bladder control problems good upright posture, diaphragmatic breathing exercises along with regular pelvic floor exercises can help you optimise your pelvic floor training.
Diaphragmatic Breathing Exercises
Diaphragmatic breathing exercises aim to normalise breathing patterns so that the diaphragm is used appropriately with the trunk muscles during normal breathing so that upper chest breathing is minimised and the upper abdominal muscles are relaxed.
Starting Position
Start lying down with your head supported by a pillow and your knees bent. Place one hand on your upper abdomen just below your sternum and the other hand at the side of your chest on the lower part of your rib cage. Alternatively if you find you have difficulty performing this breathing technique lying down, try it sitting down with one hand placed on your upper abdomen to feel the outward movement with your in breath as shown below.
Feeling breathing exercises
Diaphragmatic Breathing Technique

Breathe in slowly and deeply so that you feel your belly rise under your hand. You may also notice your lower rib cage move wide under your other hand – remember the focus is upon keeping the upper chest muscles relaxed and using the diaphragm to breathe. This technique can be cued by thinking to “breathe into the belly”.
Breathe out by letting the rib cage fall back to resting. You should feel a gentle rise and fall of your belly under your hand.
Progressing Diaphragmatic Breathing Exercises
When you have mastered diaphragmatic breathing exercises lying down, it is important to practice doing them sitting and standing upright. Don’t forget the need for good upright posture in allowing you to do your breathing exercises effectively. Try to then move around and walk with diaphragmatic breathing when you feel confident to do so.
How Many Diaphragmatic Breathing Exercises?
Practice these breathing exercises at regular intervals throughout the course of your day when learning this technique. Try to breathe slowly and deeply using your diaphragm to inhale and let the air passively leave your body, don’t force the air out of your lungs. Do what feels comfortable for your body- a minute or two of diaphragmatic breathing when starting out is great. Then try to build on this up to five minutes at a time if you can.
Sometimes diaphragmatic breathing technique can make you feel a little out of breath when starting out, especially if you are accustomed to breathing with your upper chest. If this happens stop, take a break and try again later when recovered. Remember the ultimate goal is to promote a pattern of diaphragmatic breathing and reduce upper chest breathing as you go about your daily life. Regular daily practice will help you achieve this goal.
Exercises for Pelvic Floor Tension & Spasms
Yoga poses can help reduce stress and stretch the connective tissue of the pelvic floor. The pelvic floor is made up of muscles. The small puborectalis, pubococcygeus and iliococcygeus muscles together are called the levator ani, which, along with the coccygeus muscle, forms the pelvic diaphragm. They form a hammock of muscles at the bottom of the pelvis that support the bladder, uterus and rectum. Openings in the muscles allow these organs to connect with the outside of the body through the urethra, vagina and rectum.
Locating and Feeling the Pelvic Muscles
Women should concentrate on identifying the muscles by trying to interrupt the flow when urinating. Visualize lifting the pelvic floor muscles and tightening them. When you can successfully stop and start the urine flow repeatedly you are gaining conscious control over the muscles of the pelvic floor. Men and women should practice tightening the rectal sphincter muscle. At first it may be difficult to feel the specific muscles you are exercising, but with practice you will be able to exercise the right muscles and you will feel them becoming stronger. Alternately contracting and relaxing the muscles will help to reduce muscle spasms.
Levator ani syndrome refers to chronic pain in the muscles of the pelvic floor, due to muscle spasms. Mind/body techniques such as breathing exercises and yoga can be very helpful for pelvic pain that is muscular in origin, according to the University of California School of Medicine. Since the spasm is often due to stress, learning to reduce stress with breathing exercises makes sense.
Breathing Exercise
Lie down comfortably with a small pillow under your knees. Place your hands over the bottom of your ribs, fingertips touching. Inhale slowly until you feel your ribs expanding. Hold the breath for one second and then slowly exhale. This trains you to fill your lungs completely with each breath, and then empty them completely as well. Practice for five minutes. Focus on how your breathing feels and when other thoughts come up, let them go and go back to focusing on your breath.
Stretching Exercises
Yoga exercises will help you gradually stretch and relax pelvic floor muscles. Basic yoga poses like the bridge pose, bow pose, locust pose and cobra pose stretch the muscles surrounding the lower abdomen. Add stretches for the inner thigh and hamstrings to complete the session. Learning from a yoga instructor will help you do the poses correctly. Then make a habit of daily practice, even after your symptoms reduce and you feel better. The bow pose is difficult; don’t attempt it until your yoga teacher feels you are flexible enough to avoid straining your joints and muscles.
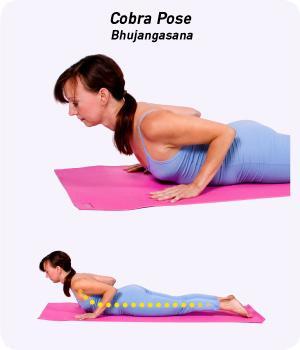
Cobra Pose
Lie down on the floor, face down. Place your hands beneath your shoulders, with your elbows close to your sides. Inhale as you press your hands down and lift your chest off the floor. Extend your head and neck upward, stretching the front of your chest and abdomen. Exhale as you return to the beginning position.
Bridge Pose
Lie on your back with your knees bent, feet together. Keep your arms on your side, palms on the floor. Inhale as you lift the hips towards the ceiling, keeping your feet and palms flat on the floor. Hold this position while you stretch your arms overhead. Exhale as you return to the starting position.
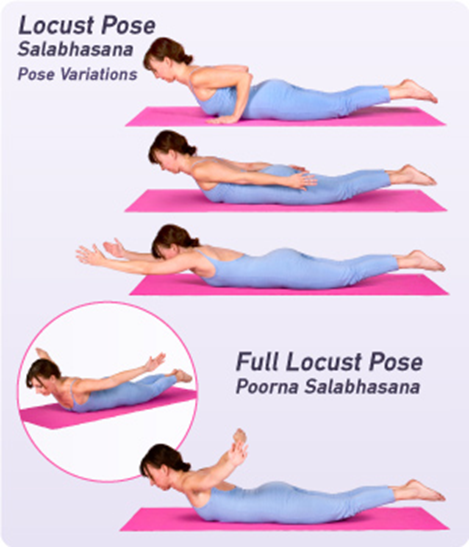
Locust Pose
Lie on the floor face down with your arms along the sides of your torso, palms up, forehead resting on the floor. Turn your big toes toward each other and tighten your buttocks so your coccyx presses toward your pubis. Lift your head, shoulders, arms and legs off the floor, so your body is resting on your abdomen and lower ribs. Stretch your arms back toward your feet, keep legs and buttocks tense, and hold this position for 30 seconds. Breathe slowly in and out while holding the pose, and release the position with an exhalation.
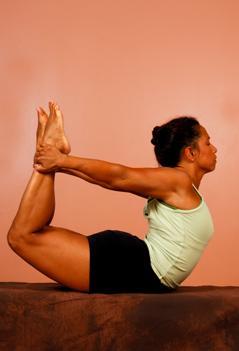
Bow Pose
Begin face down as in the locust pose. Bend your knees to bring your heels close to your buttocks. Reach back and grasp your ankles with your hands, keeping your knees close together. Inhale and push your legs away from your buttocks, keeping your hands on the ankles, to pull your head, shoulders and upper torso off the floor. Avoid a rocking motion. Hold the pose for 30 seconds and release on an exhalation.
Call as needed, thx – Ashley 615-301-1000

BOW POSE Dhanurasana” (DAHN-yoor-AHS-uh-nuh)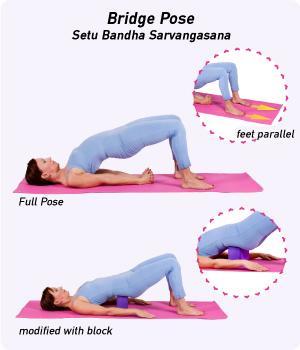
How to Stretch Your Pelvic Area
Your muscles near your pelvis are very important to stretch. They get tight very quickly and can become a serious problem if not handled. When you stretch you are strengthening your body and you will feel great. Being loose and flexible also helps with everyday activities. I’ll teach you how to stretch your pelvic area properly and effectively.
Instructions – Difficulty: Moderately Easy / Things You’ll Need: * a floor * yoga mat (optional)
- The Butterfly Stretch: You may be familiar with this but you should know how to do it correctly. Sit on the floor on your butt. Stretch your legs straight out and then bring your feet in towards your pelvis. Put the bottoms of your feet together and pull them into your body. You can also lean over to feel a more effective stretch.
- Side Split: Stand up with your feet slightly farther out to the sides. Slowly push each of them farther away from your body. Go down as far as you can to the floor. Hold your lowest position for a count of ten. After that, it is easier to just fall onto your butt and then get up.
- Eye of the Needle stretch: You will feel a pull in your outer buttocks. Lie down on your back and put both of your feet in the air. Put one of your legs on top of the other’s thigh. Keep the straight leg high in the air. Now grab the back on your straight leg and pull it into your body. Repeat this with both legs.
- The Hip Bend: Keep your back straight and feet 12″ apart. Clasp your hands behind your back and bend at the hips. Breathe deeply and relax. Slowly raise hands above your head and stretch while still bending. Gently rise.
- The Pelvic Tuck: Go down on all fours and keep your knees 12″ apart. Arch your back by tucking your pelvis and clenching your buttock muscles. Hold for 5 seconds and release. Repeat 5 to 10 times. You can also gently rock your pelvis.
- The Lower Back Release: Lie flat on your back and keep your arms tucked on the sides, palms facing down. Press the floor with your feet and lift your pelvis. Let your spine rise as high as your neck. Breathe out and come down gently. Raise your knees towards your face so that you can hug them. Hold. Take a few deep breaths. Straighten one leg and continue hugging the other knee. Repeat exercise with the other leg. Again bend both knees and cross your feet at the ankles. Rotate hips making small circles with your lower back. Repeat in the other direction.
- Spinal Turn: Lie on your back and stretch out arms and shoulders at right angles. Breathe out and turn your knees to the right and head to the left. Hold. Come back, keeping your knees bent, and relax. Repeat in the opposite direction for a total of 10 times in both directions.